How to Change Disc Brake Pads
A twenty-minute job with one expensive way to get it wrong: buying the wrong shape. Start with the fitment list, not with the pads.
Heads up: we earn a commission if you buy through the links on this page, at no extra cost to you. It never decides what makes the list — here’s how that works.
The job is: check the pads are worn, buy the pad shape your caliper takes, push the pistons back, swap the pads, re-align the caliper, bed them in. Twenty minutes with no special tools beyond a hex key. The one step that genuinely goes wrong is the second one, because disc pad shape is caliper-specific and there are dozens of shapes.
So this page starts where the mistake happens rather than where the tutorial usually starts.
Step 0: are the pads actually worn?
Look through the top of the caliper with a light, or take the wheel out and look straight in. You are looking at the friction material on the pad, not the metal backing plate it is bonded to. The usual guidance is to replace when the friction material is down to around half a millimetre, or sooner if you can see the backing plate anywhere across the pad.
Two symptoms that are not worn pads, and which replacing pads will not fix: a lever that pulls to the bar with a spongy feel (that is air or fluid, i.e. a bleed), and a brake that squeals while braking but still stops the bike (usually contamination or bedding). Our squealing brake guideworks through the noise causes in order, and the first one it tells you to rule out is contamination — because new pads fitted to a contaminated rotor are new contaminated pads.
Step 1: find your pad shape, from the published list
This is the step that decides whether the job takes twenty minutes or two trips. Pad shape is defined by the caliper, not by the bike, the brand of groupset, or the wheel size.
Both big brake makers publish compatibility information, and this is one of the rare maintenance jobs where the manufacturer documentation is genuinely the right source rather than a forum post. Shimano publishes a pad compatibility list that names which caliper models each pad fits — so the L-type resin pad on our roundup is published as fitting BR-R9270, R8170, R7170, R9170, R8070 and R7070 road calipers plus BR-RX820, RX810, RX410 and RX400 on the GRX side, while the G-type resin pad is published for BR-M6000, M7000, M8000, M6100, M7100 and M8100. Those are two different shapes and they are not interchangeable. SRAM publishes its own brake pad guide with the equivalent information for its calipers.
How to find your caliper model: it is printed on the caliper body, usually on the outboard face or underneath. Clean the dirt off and read it. Write it down somewhere you will find it next time, because you will need it again in a year.
Our disc brake pad roundup records the published caliper list for every pad it ranks, which is specifically so you can check fitment before buying rather than after.
Step 2: choose the compound, which is a separate decision
Having found the shape, you usually have a choice of compound in that shape: resin (also called organic) or metallic (sintered), and sometimes a semi-metallic in between.
The trade in one line: resin is quieter and bites better from cold, metallic lasts longer and holds up better in sustained heat and wet grit. We take it apart properly in organic versus sintered, and one published detail worth repeating here: Shimano states that its “05” pads are 40% more durable than the “03” pads of the same type — a rare case of a maker publishing a comparative durability figure at all.
The compatibility trap inside the compound choice: some rotors are rated for resin pads only. If your rotor says resin-only, metallic pads will overheat it. Check the rotor as well as the caliper.
What the job needs
Not a ranking — the parts and the one tool this procedure calls for, listed after the fitment section because the pad you need depends on the caliper model you just read off the bike. Check the published caliper list on the pad roundup before buying either pad below.
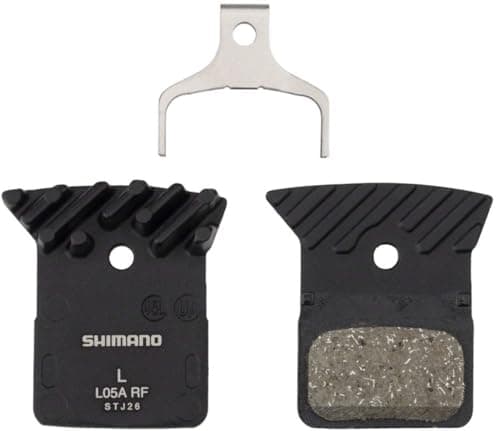
Shimano L05A-RF Resin Pads
The L-type resin pad with a finned alloy back plate, published as fitting Shimano's road and GRX calipers. The fins are for heat; check your caliper model against the published list first.
$23.46 · View on Amazon$37.00 −37%
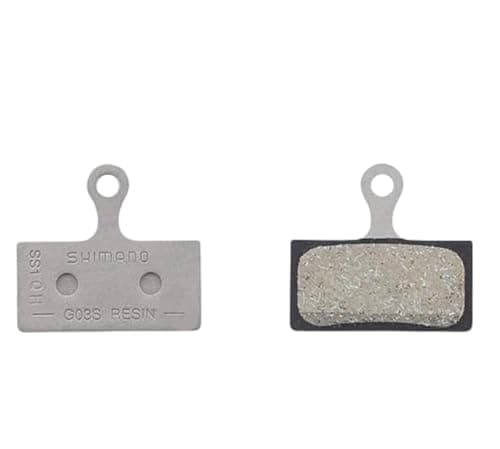
Shimano G05S-RX Resin Pads
The G-type resin pad with a stainless back plate and spring, published for Shimano's mountain calipers — a different shape from the L-type above, not a different grade of the same thing.
$14.25 · View on Amazon$15.00 −5%
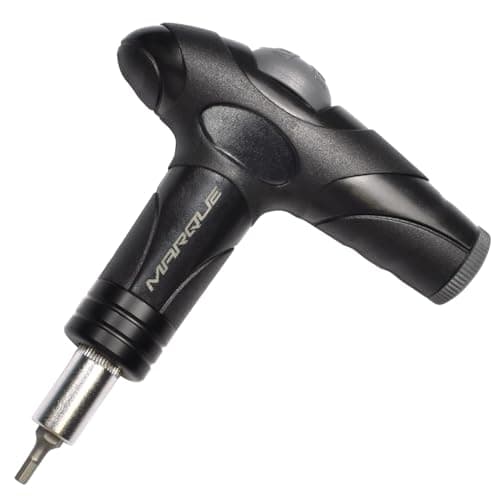
MARQUE Adjustable Bike Torque Wrench
For the rotor and caliper bolts on reassembly. Published at 4, 5 and 6 Nm settings, which covers the range most caliper fixing bolts fall in — look up your own figure.
We haven’t tested any of these — they’re the parts the job above calls for, listed so you don’t have to go hunting. Prices are live from Amazon and we earn a commission if you buy. Prices as of October 18, 2026. #ad
Step 3: take the old pads out
Park Tool’s pad removal and installation procedure is the reference for this and worth reading alongside the summary here.
Remove the wheel. Most calipers retain the pads with a cotter pin or a threaded bolt through the pad tabs, often secured by a split pin or a clip you straighten first. Remove the retainer, then slide the pads out of the top of the caliper — on most designs they come out upwards, together with the spring that sits between them.
Keep the spring. It is easy to lose and new pads often come with one, but not always. Note which way round it sat.
Step 4: reset the pistons — carefully
As the old pads wore down, the pistons advanced to compensate. New pads are thicker, so the pistons have to go back before they will fit.
Use a wide, flat plastic tool or a clean tire lever and press the pistons squarely back into the caliper. Press on the piston face, evenly, and do not lever against the edge of a piston or against the rotor.
Two things not to do.Do not use a screwdriver or anything with an edge — a scratched piston or a nicked seal is a brake that leaks. And do not pull the brake lever with the pads out and the pistons pushed back, because the pistons can come far enough forward to unseat, which turns a twenty-minute job into a bleed.
Step 5: fit the new pads and reassemble
Handle the new pads by their backing plates. Fingerprints on the friction surface are contamination, and contamination is the single most common cause of a brake that squeals from the first ride. If you do touch the faces, clean them with isopropyl alcohol — never with a solvent-based degreaser or a spray lubricant, and never anywhere near the rotor.
Fit the spring between the pads, slide the assembly in from the top, replace the retaining pin or bolt and secure it. Put the wheel back in and make sure it is fully seated in the dropouts — a wheel that is not seated square is the most common reason a brake rubs after a pad change.
Torque the bolts you loosened to the figure printed on the part or published by the maker. Our torque guide covers how to find that figure and why guessing on brake hardware is the wrong place to guess.
Step 6: align the caliper, which almost everyone skips
Park Tool publishes a hydraulic disc brake alignment procedure and it takes about a minute. Loosen the two caliper mounting bolts just enough that the caliper can float. Squeeze and hold the brake lever firmly, which centres the caliper over the rotor. With the lever still held, tighten the mounting bolts evenly. Release and spin the wheel.
If it still rubs, re-do it; if it rubs in one spot only as the wheel turns, that is the rotor rather than the caliper and it needs truing with a rotor tool rather than another alignment attempt.
Step 7: bed the pads in before you need them
New pads do not brake properly until a layer of pad material has transferred onto the rotor. Until that happens the brake feels weak, and discovering that at the bottom of a descent is the worst possible moment.
The bedding procedure both makers describe: from a moderate speed on a safe, flat, traffic-free stretch, brake firmly to walking pace without locking the wheel, release, and repeat. Do it something like ten times, let the brakes cool, and expect the lever feel to firm up noticeably as you go. Do not come to a complete stop with the lever held while the rotor is hot, which can deposit material unevenly.
What this page will not tell you
Your torque figures or your pad wear limit in millimetres for your specific brake, because those are published per model and we are not going to put a number on your brake that we read off someone else’s. Find your caliper model, then find its documentation — and the reason this page keeps saying that is that it is the one habit that makes every other hydraulic brake job straightforward.
We also have not performed this job on your bike, have not tested any pad, and hold no measurement of any compound’s performance. See how we research. If your brakes feel spongy rather than weak, this is the wrong page — that is a bleed, which is a job we would rather you took to a shop than learned from a web page.
The sequence, and what each step prevents
The order matters more than the technique. Five of these seven steps exist to prevent one specific, common, avoidable failure — named in the right-hand column.
| Step | What you do | Skip it and |
|---|---|---|
| 0. Confirm wear | Look at the friction material, not the backing plate | You replace good pads and the real fault is still there |
| 1. Read the caliper model | Check the maker's published fitment list | You buy the wrong shape — the most common failure in this job |
| 2. Choose compound | Resin or metallic, and check the rotor's rating | Metallic pads on a resin-only rotor overheat it |
| 3. Remove old pads | Retainer out, pads up and out, keep the spring | You lose the spring and the new pads rattle |
| 4. Reset pistons | Press squarely with a plastic tool | A scratched piston or unseated seal — now it is a bleed |
| 5. Fit and torque | By the backing plate only; wheel fully seated | Fingerprints on the pads, or a brake that rubs on a crooked wheel |
| 6. Align the caliper | Loosen, hold the lever, retighten evenly | Constant rub — the thing everyone blames the pads for |
| 7. Bed in | ~10 firm stops from moderate speed, no locking | Weak brakes until the pads bed in by accident, mid-descent |
Step 1 is the only one that costs you a day. Every other mistake on this list is recoverable in the same session; buying the wrong pad shape means waiting for a delivery with the bike in pieces.
Common questions
How do I know which disc brake pads fit my bike?
By the caliper, not the bike. The caliper model is printed on the caliper body — read it, then check it against the maker’s published fitment list. Shimano publishes a pad compatibility list naming which calipers each pad fits, and SRAM publishes an equivalent guide. Our pad roundup records the published caliper list for each pad it ranks.
When should I replace disc brake pads?
When the friction material is down to around half a millimetre, or as soon as the metal backing plate is visible anywhere across the pad. Look through the top of the caliper with a light, or take the wheel out for a clear view. A spongy lever is not worn pads — that is air or fluid.
Do I need to push the pistons back when changing pads?
Yes. The pistons advanced as the old pads wore, and new pads are thicker. Press them back squarely with a wide plastic tool or a clean tire lever — never anything with an edge, which can scratch a piston or nick a seal. And do not pull the lever with the pads out.
Why do my brakes rub after changing the pads?
Two usual causes. The wheel is not fully seated in the dropouts, or the caliper needs re-aligning — loosen the mounting bolts, hold the brake lever firmly to centre the caliper, and retighten with the lever still held. If it rubs only at one point as the wheel turns, the rotor is bent rather than the caliper being misaligned.
Do new brake pads need bedding in?
Yes, and it is the step that gets skipped most. New pads brake weakly until pad material has transferred onto the rotor. Make about ten firm stops from a moderate speed on a safe flat road without locking the wheel, then let the brakes cool. The lever feel firms up noticeably as you go.
Can I use metallic pads instead of resin?
Usually, if the shape is right and your rotor is not rated resin-only — check the rotor, which often says. Metallic pads last longer and cope better with sustained heat and wet grit; resin pads are quieter and bite better from cold. The full trade is at organic versus sintered.
Sources
- Park Tool — Disc Brake Pad Removal and Installation. The reference procedure for retainer removal, pad extraction, spring orientation and piston reset — retrieved 2026-10-17
- Park Tool — Hydraulic Disc Brake Alignment. Source for the loosen / hold the lever / retighten caliper centring procedure in step 6 — retrieved 2026-10-17
- Shimano product information — disc brake pad compatibility (C-192). Source for the published caliper fitment lists quoted for the L-type and G-type pads, as recorded on /road/best-disc-brake-pads — retrieved 2026-10-17
- SRAM — Brake Welcome Guide, brake pads. SRAM's own published pad compatibility and compound guidance for its calipers — retrieved 2026-10-17
- Amazon listings for the Shimano L05A-RF and G05S-RX pads and the MARQUE adjustable torque wrench as recorded in content/catalogue.json — source for the published back plate materials, the included spring, and the 4 / 5 / 6 Nm torque settings. No pad listing publishes a wear limit in millimetres
Read next
- The best disc brake pads
Eight pads with the published caliper fitment list for each.
- Organic vs sintered brake pads
The compound half of the decision, including the resin-only rotor trap.
- How to fix squealing disc brakes
If the brakes are noisy rather than worn, start here instead.
- The bike bolt torque guide
Finding the figure for the bolts you just loosened.
We haven’t ridden or tested any of the products on this page, and we don’t pretend otherwise. Read how we research — or tell us we’re wrong and we’ll log the correction.